Install WorkZone Content Server Imaging
Overview
To be able to use WorkZone Content Server Imaging, the InfoScan programs must be installed both on the server, which is importing the files with scanned documents to WorkZone Content Server, and on the scanning clients.
Several custom labels must be configured before the scanning can take place. The configurations are described below.
Configure custom labels
If the custom labels, which are a prerequisite for using WorkZone Content Server Imaging (for more information, see Prerequisites), are not already configured during the installation of the WorkZone Content Server database, you must perform the following procedure to configure the custom labels.
You can an SQL productivity tool such as Oracle’s SQL Developer or ScanSql, both of which are included in a standard WorkZone installation and available on the WorkZone server.
- Start the
scansql.exeprogram, select the relevant DSN and log on.
The ScanJour SQL window appears. - Select Sjbase > Load data > Skan.
The Scanning module data window appears.The remark in the window saying that further configuration is required refers to the configuration described in the following.
- Select the Custom labels check box and click Execute.
The necessary custom labels are created and the Scanning module data window closes. - Close the ScanJour SQL window.
Install InfoScan on the Server
- Start the installation program by double-clicking the
setup.exefile in the folder..\ServerScan\1.8.86\1.8.86.ServerThe Vælg installationssproget window appears. - Select the installation language from the list and click OK.
The InfoScan - Install Wizard for InfoScan installation wizard appears. - Click Next >. Read the license agreement and if you accept it, click I accept the terms in the license agreement, and then click Next >.
- On the Setup Type page, click Typical to install all program functions.
- Click Next >. The Ready to Install the Program window appears.
- Click Install. The installation process starts. When the installation has completed, the Install Wizard Completed window appears.
- Click Finish to close the installation wizard and then restart the computer.
Install InfoScan on the Client
- Start the installation program by double-clicking the
setup.exefile in the folder The..\ServerScan\1.8.86\1.8.86.ClientVælg installationssproget window appears. - Select the installation language from the list and click OK.
The Welcome to the Install Wizard for InfoScan page appears. - Click Next >. Read the license agreement. If you accept it, click I accept the terms in the license agreement, and then click Next >
- The Setup Type window appears. Do as follows:
- Select Typical, if you want to install all program functions and then go to step 8.
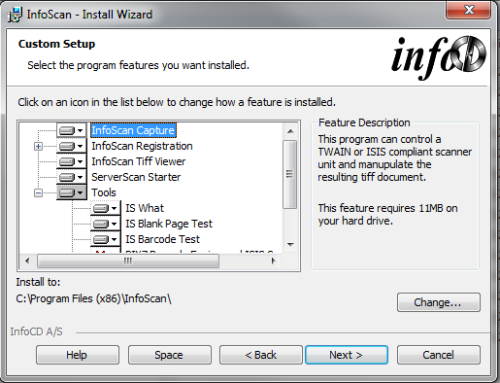
- Select Custom, if you want to select the program functions to be installed
-Or-
- Select the programs and tools that you want to install. If you want to make the installation in a different folder than the one specified below the Install to: label, you can select another folder by clicking Change....
- Click Next >. The Ready to install the Program window appears.
- Click Install to start the installation. When the installation is complete, the Install Wizard Completed page appears.
- Click Finish to close the wizard.

